Cakes on a Plane!
< Back to beginning | Next step: Mixing >
Prep
Mise en place
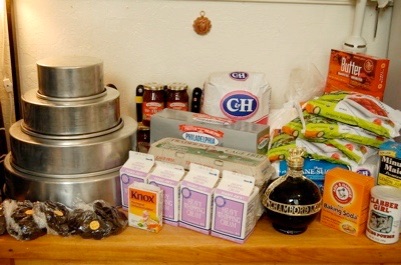
Sitting on my cutting table are the ingredients for Heather and Pete's wedding cake, from unsweetened chocolate through various luscious forms of fat to frozen raspberries. My husband loved the pimped out bottle of Chambord, while I was partial to the 8-pound tower of butter. Stacked at left are the 6", 9", 12", and 14" pans for four tiers of cake.
Our breakfast table will become my prep area. Arrayed below are tools that are useful for baking a large cake. I ended up not using everything here (more later on how frosting the cake ended up being a rush job rather than a leisurely piping exercise), but the most useful equipment for a basic cake baker's collection include:
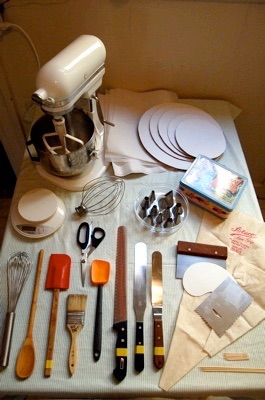
Standing mixer: You can make a small cake fine with a hand mixer, but a KitchenAid makes creaming big batches of butter and sugar and eggs much, much, much easier. More importantly, while it fluffs and smoothes the fat, you can be doing something else.
Parchment paper: Lining cake pans with parchment is essential for smooth surfaces and easy de-panning. The paper also provides additional support as you move and position delicate layers. They make very handy pastry bags for small detail work with multiple colors. I'm still pulling parchment sheets from a box I bought ten years ago at a local restaurant supply company. Next to the mixer are these flat sheets, significantly cheaper and easier to use than rolls sold at the grocery store.
Cake rounds: To support the layers while you fuss with them and later stack them in all their decorated glory, food-safe cardboard is worth the few extra dollars. Although they come pre-cut to fit standard cake sizes, I couldn't find a 6" and so just cut one from an 8" round.
Toothpicks and skewers: To help test the cake for doneness and to mark the layers for cutting.
Scale: The best way to measure ingredients for accurate, consistent baking is by weight. Not essential for the general cook but certainly important for the avid baker.
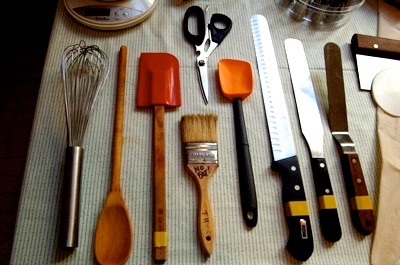
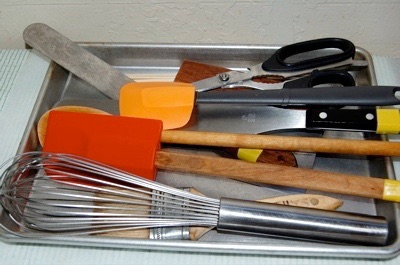
Offset spatula: This humble tool is part of every professional pastry baker's kit. It's the brown-handled tool to the right, between the flat spatula and the pastry bag. Like all good tools, it helps you do many things: smooth batter, move layers, frost cakes,stir, measure and mark. It flips pancakes and fish fillets at the stovetop pretty well, too.
Pastry brush: I use a sturdy, inexpensive one from the hardware store. It's marked NO FAT! to prevent rancid oils and spicy barbecue sauces from showing up in my desserts.
Kitchen shears: These are heavy-duty ones I use for everything from snipping chives to boning chicken. However, I never use them for cutting paper or cardboard, as that will dull good scissor blades. (My mother, a tailor, broke me of that bad habit early on in my life.)
Whisk: This one is my general purpose whisk. I rarely whip cream by hand anymore, so my larger balloon whisk has been retired to the back room.
For the cake decorator on the go:
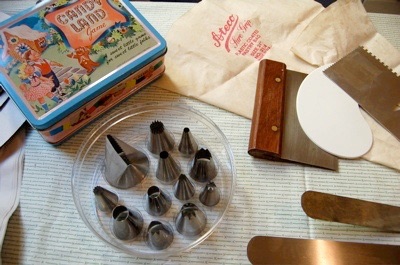
Large pastry tips: Since I don't really do fine work as much anymore, I got these extra big tips. Good for quick, breezy touches. That really wide one has both a flat side for wide swaths of frosting and a ridged edge for the basket-weave look.
Pastry bag: Professionals use plastic, disposable bags for easy filling, storage and clean-up. I still have my old cloth bags, though, and since I'm not making a living at this, I can afford to waste time at my kitchen sink cleaning them up. For small projects, I just fold bags from parchment paper.
Bowl scraper: Molded from soft plastic to curve with the sides of bowls, these little thingy's are great for the frugal cook wanting to use every last bit of batter or frosting.
Bench scraper: I use this more in bread baking and butchery than pastry work, but it's still handy to have around for tasks like cutting big bricks of butter. It's my most important cleaning tool: I literally scrape my work bench with it to sweep away the day's build-up of flour, batter, butter and chocolate.
Cake edger: I'm not really sure what these are called, but that seems like as good a name as any. The flat side helps me smooth and square the sides of cake layers; the dovetailed and ridged edges add textured stripes for a quick decorative touch.
While I work in the kitchen, I keep my handtools gathered, visible and ready in a small sheet pan.
Lining pans
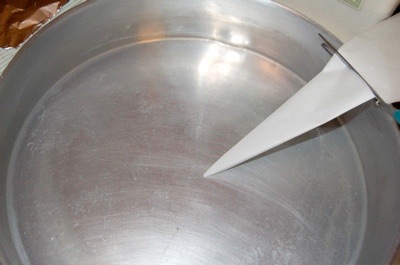
In addition to greasing and flouring my cakes pans, I line them with a round of parchment paper. After folding a large sheet into quarters and then continuing down to a narrow wedge, I eyeball it by placing the tip at the center of the pan and then cut according to its radius. You can also just trace the bottom of the pan and cut a big circle that way; be sure to cut inside the pen line, so your ink doesn't leach into the cake.
Cake formulas
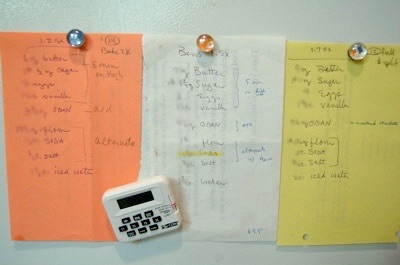
The cake recipes go up on my freezer door, along with my timer (which can count up or down on four different dishes). My friend, Nancy Kux, owner of her own bakery for over 25 years, very generously shared her formulas for a chocolate wedding cake. She saved me from many rounds of test batches and from much wasted time and ingredients. The ingredients are listed by weight and the yields are scaled to the specific pan sizes. The formulas must be adjusted for the significant differences in evaporation and heat distribution in the increasingly wider cakes.
For 150 guests, a 4-tier cake should be enough. I will split each tier of cake into two layers and spread a raspberry filling spread between the layers. The top two tiers, 6" and 9" cakes, can be mixed and baked as one batch. The 12" tier will be prepared by itself. The 14" tier, too big to be baked evenly and split safely, will require two batches; since I only have one 14" pan, I'll need to mix and bake each layer separately.
With one mixer and one home oven (sans convection fan), I anticipate a nice, long day in the kitchen.
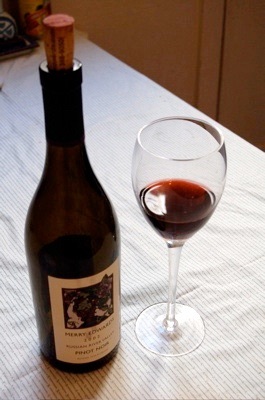
For the cook
Fortunately, I have a bottle of wine already opened and poured to help me pass the hours in the kitchen.
June 2006
© Thy Tran